“AI product photography tool” now describes several different products. One removes backgrounds and standardizes listings. Another generates one-click lifestyle scenes. Another exposes API operations for a catalog pipeline. A creative canvas and a multi-model workspace solve different problems again.
That makes a universal leaderboard misleading. This guide compares the current workflows described on each vendor's official product and pricing pages, then applies the product-fidelity checks from our first-hand, thirty-category image-model tests. It does not pretend that one reviewer ran every paid plan through a statistically powered benchmark.
Quick answer: which tool fits you
- Photoroom: listing cleanup, background removal, staging, batch export, and mobile/web production in one product.
- Pebblely: the shortest upload, describe, generate flow for lifestyle product scenes.
- Claid: API operations, chained workflows, and batch automation for catalog pipelines.
- Flair: art-directed creative work, custom models, image variations, and campaign assets.
- Masonry: comparing several underlying image models on the same product in one canvas before standardizing a recipe.
Photoroom vs Pebblely: the direct answer
Choose Photoroom when the job begins with listing cleanup and continues through background removal, retouching, enhancement, batch export, templates, and mobile or web production. Choose Pebblely when the priority is the shortest path from one product upload to several staged lifestyle scenes using a description or one of 40-plus themes.
| Merchant decision | Photoroom | Pebblely |
|---|---|---|
| Fastest first lifestyle scene | More tools around the scene workflow | Three-step upload, describe, create flow |
| Listing cleanup | Dedicated remover, retouch, fill, resize, enhancer, and shadow tools | New workflow skips manual background removal before generation |
| Repeat catalog work | Batch editing and exports; Shopify integration starts on higher plans | Bulk generation on Basic and Pro; bulk download in the rebuilt workflow |
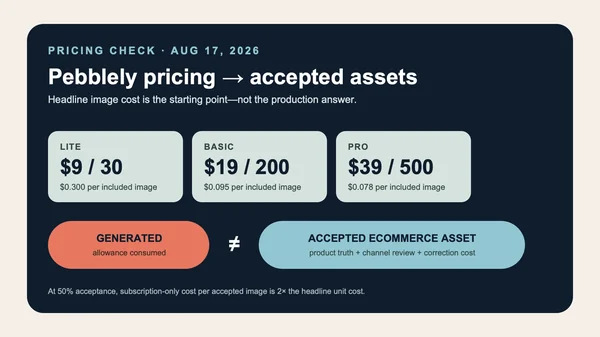
| How usage is metered | Shared AI-credit pool plus monthly export allowance; different tools consume different amounts | Monthly image allowance: 30 Lite, 200 Basic, or 500 Pro on the current pricing page |
| Better fit when | One suite should handle cleanup, staging, templates, and channel production | A focused product-photo flow and predictable image count matter most |
This is a workflow comparison, not a fidelity verdict. Run the same difficult SKU, scene brief, output count, and review sheet in both tools. Compare accepted assets, reviewer time, and corrections rather than picking from a feature list. Photoroom's current plan documentation and pricing page were rechecked on August 15, 2026; Pebblely's current pricing and March 2026 rebuilt workflow support the comparison above.
Ecommerce operator shortcut: if tool selection is only one step in a larger merchant job, use the AI for ecommerce workflow map to choose among 22 catalog, PDP, acquisition, evidence, lifecycle, and wholesale workflows. Start from the business finish line, then select the minimum authority record, review gate, and image workflow needed to reach it.
Evidence boundary: competitor features and prices below come from official pages checked on August 4, 2026, with Photoroom and Pebblely rechecked on August 15 after Search Console surfaced direct comparison intent. The product-fidelity examples are first-hand Masonry model outputs. This is a workflow comparison, not a controlled five-tool output benchmark.
How AI product photography actually works
Almost every tool worth using starts from your real product photo, not from a text prompt alone. You upload a shot of the bottle, the sneaker, the candle. The model isolates the product, then generates a new background, new lighting, and new surfaces around it. The good ones relight the product itself so it sits believably in the new scene, with shadows and reflections that match.
That word "believably" is the whole game, and it is where these tools live or die. The point of a product photo is to sell the actual thing in the box. If the AI quietly changes the cap color, smooths away the texture of your packaging, or invents a label that is not yours, you have a pretty picture of a product you do not sell. Photographers call this product fidelity. When you test any of these tools, fidelity is the only thing that matters in the first five minutes. Generate the same product three times and check whether it is still recognizably your product each time.
If replacing the background is the exact job, the AI product-background route test compares a general edit, structured placement, and deterministic source-card fallback on one approved SKU—and keeps both attractive failures visible.
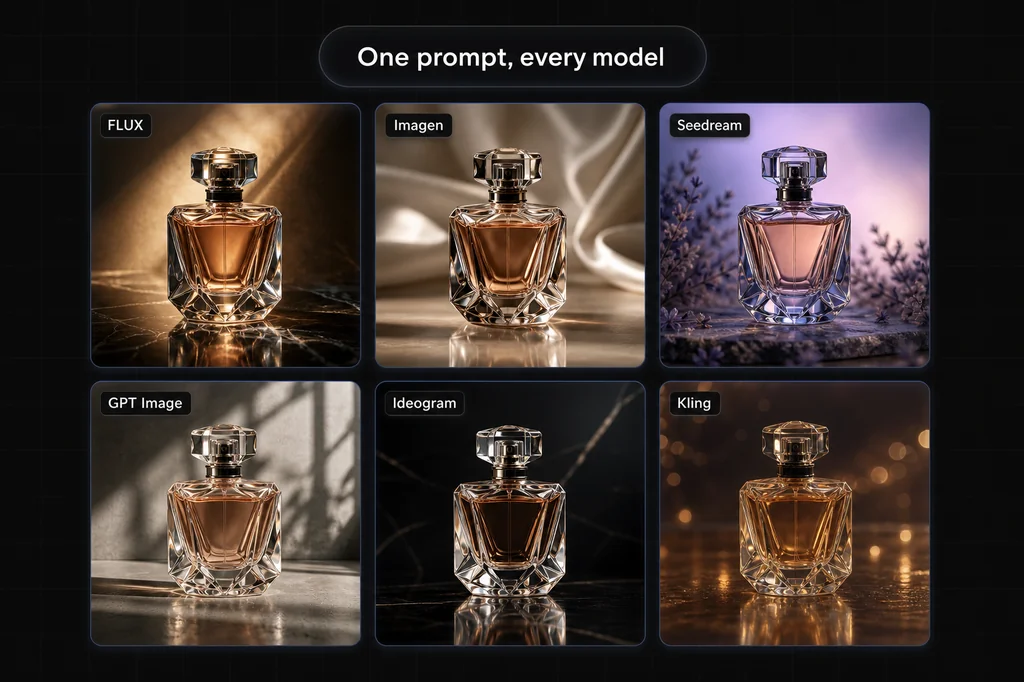
This also explains why results vary by product type. A solid, opaque object with a matte surface tends to be more forgiving than transparent perfume, chrome, jewelry, or fine printed text on a curved package. We tested this model by model across thirty product categories in our best AI image model for product photography roundup.
Compare total cost per accepted image
Do not compare a studio day with one AI generation. They are not equivalent deliverables. Price the same output list and include:
- subscription, API, or generation credits;
- input photography and product prep;
- prompt, layout, and art-direction time;
- human review, label repair, retouching, and export;
- rejected candidates and reruns;
- any real reshoot needed for an accuracy-critical frame.
Then divide total production cost by accepted, channel-ready images. Track the same quotient for cycle time. A low generation price with a 10% acceptance rate can be more expensive than a higher-priced workflow that preserves the product on the first pass.
The tools, one by one
Photoroom
Photoroom's current plans combine background removal, retouching, white backgrounds, AI staging, batch export, templates, brand kits, and mobile/web access. Its May 31, 2026 plan documentation says Free has limited exports and AI generations and cannot be used commercially. Paid Pro, Max, Ultra, and Enterprise plans add increasing AI-credit and export allowances; the pricing page notes that allowances can vary by country or region. Choose this workflow when listing cleanup and repeatable catalog formatting are the center of the job.
Pebblely
Pebblely rebuilt its workflow in March 2026: upload the product as-is, crop it, describe the scene, and generate, without a separate background-removal or canvas-positioning step. Its current pricing page lists Lite at $9 for 30 images, Basic at $19 for 200, and Pro at $39 for 500, with custom prompts and 40+ themes. Choose it when reducing setup steps matters more than building a complex production pipeline.
Claid
Claid's business product exposes product scenes, fashion models, enhancement, video, and more than twenty image/video API operations. Its API can chain operations such as background removal, enhancement, and upscale in one workflow. The current pricing page lists a free trial, credit-based web plans, batch processing on higher tiers, and separate API plans. Choose Claid when the integration, throughput, and repeatability of the pipeline are requirements—not merely because the catalog is “large.”
Flair
Flair's current plans emphasize generated images, custom models, upscales, variations, video, and an AI product-photography API on Scale and Enterprise. The free plan lists five generated images; paid tiers increase generation and custom-model allowances. Choose it when the creative direction or a trained brand/product model is the core requirement. Before buying, confirm that the current editor and quota fit the number of scenes and revisions in your actual brief.
Masonry
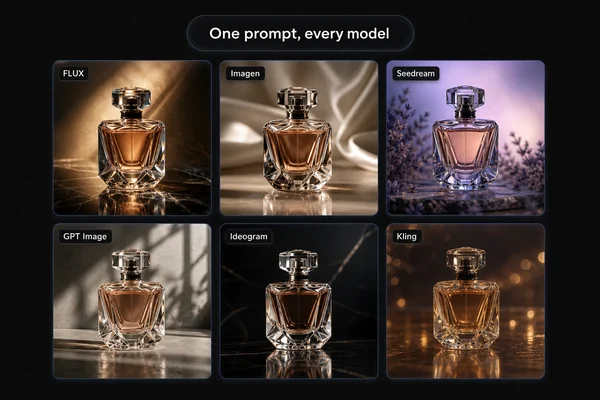
Masonry is the multi-model option in this list. One canvas gives you access to models including Nano Banana, FLUX, Seedream, Imagen, and GPT Image, so you can keep the product, prompt, and working context together while comparing outputs. That matters when you do not yet know which underlying model will preserve a particular material, label, or geometry best.
The first-hand evidence is the thirty-category product test: no one model won every product type, and attractive candidates still failed on labels, branding, geometry, and materials. Masonry's value is reducing the friction of running that comparison on your own SKU. It does not guarantee that a reference image will lock the product exactly.
Choose Masonry when model comparison and iterative creative work are part of the job. If you only need one-tap background removal, or an API that applies one locked catalog workflow to thousands of files, another tool in this list may fit better.
Side-by-side comparison
| Tool | Primary workflow | Official entry point checked Aug. 4, 2026 | Validate before buying |
|---|---|---|---|
| Photoroom | Listing cleanup, staging, batch, mobile/web | Free plan; Pro/Max/Ultra/Enterprise | AI-credit allowance, batch exports, marketplace workflow |
| Pebblely | Upload, describe, generate lifestyle scenes | $9/30, $19/200, $39/500 images monthly | Product fidelity, scene control, monthly volume |
| Claid | Web tools plus chained API operations | Free trial; credit plans and separate API pricing | Operation cost, rate limits, batch and integration needs |
| Flair | Creative generation, custom models, variations | Free 5 images; paid generation tiers | Commercial-license tier, custom-model and revision quota |
| Masonry | Multi-model comparison in one canvas | Credit based | Which models accept your input type and preserve the SKU |
These are workflow and plan summaries, not normalized price-per-image rankings. Allowances, billing intervals, regions, and operation costs differ. Open the linked official pricing page and calculate the cost of your own accepted deliverable.
How to make your first AI product shot in Masonry
If you want to try the multi-model approach, here is the actual flow, start to finish. You can follow along in Masonry's AI product photography studio.
- Start a new canvas and upload a clean photo of your product. A sharp, evenly lit phone photo on a plain surface is plenty. Good input makes fidelity easier for every model.
- Write a short scene prompt describing the background and mood, for example "on wet polished marble with soft window light and a faint water splash, premium skincare look." Keep it to one clear scene rather than stacking five ideas.
- Run the same input and scene brief through several image models instead of changing prompt and model together.
- Compare for fidelity first, aesthetics second. Zoom in and check that the cap, color, label, and texture are still your product across the options. Pick the model that protected your product best.
- Remix the winner: nudge the lighting, swap the surface, generate a few variations for A/B testing on your listing, and export.
The point is to learn which model handles that product and scene reliably, then confirm the recipe on several more SKUs before scaling it across the catalog.
If the immediate job is distribution rather than tool selection, use the one-product-to-ecommerce-image-set workflow to turn the approved source into a named detail, ad, and vertical-social manifest without treating every candidate as publish-ready.
If that set contains Shopify color or material variants, continue with the Shopify variant-image assignment workflow. It keeps each approved SKU tied to the selected option through the product page, gallery, cart, and checkout instead of treating a coherent-looking batch as correctly assigned.
Use the same acceptance sheet for every tool
Tool testing becomes more comparable when the production job stays fixed. Use the ecommerce product-photography prompt pack for catalog, lifestyle, paid-social, email, and collection-card briefs, then score each returned file against the same product, claim, rights, technical, and destination gates.
| Dimension | Reject when |
|---|---|
| Product identity | Shape, color, material, closure, stitching, included parts, or proportions change |
| Label and claims | Brand, quantity, ingredients, certifications, warnings, or other printed copy is wrong |
| Reflections and shadows | Glass, metal, gloss, transparency, or contact shadows contradict the scene |
| Composition | Crop, margins, camera angle, or negative space fails the target channel |
| Rights and trust | The output invents a logo, recognizable trade dress, person, review, or product result |
| Consistency | The product or brand treatment drifts across the required image set |
Generate the same number of candidates in each shortlisted tool. Blind the tool name if practical, count accepted files, and compare time and cost per accepted image.
What AI product photography still gets wrong
No tool here is magic, and the marketing pages will not tell you where the edges are. There is also a separate question no tool answers for you, which is whether the marketplace you sell on allows the output at all: we compared what Amazon, Etsy, eBay and Shopify actually permit against each platform's own documentation. After enough testing, the recurring failure modes are consistent:
- Transparent and highly reflective products: glass bottles, jewelry, chrome, and anything mirror-like still trip models up, because they have to invent reflections that obey physics. Expect more retries here.
- Fine text on packaging: small printed labels, ingredient lists, and logos often come back warped or invented. Do not trust AI to reproduce regulated label copy.
- Hands holding the product: if you want a hand model holding your item, fingers and grip are still unreliable across every tool.
- Exact brand consistency: subtle but important details, an exact Pantone, a specific stitch, a logo placement, can drift between generations. Spot-check every image you plan to publish.
- Categories where accuracy is the claim: for food, supplements, and anything where the photo implies a factual claim, treat AI scenes carefully and keep the product representation truthful.
None of these kill the use case. They just tell you where to keep a human in the loop and where a real camera is still the right call.
Pro tips for product-accurate results
- Feed it a good photo. Sharp focus, even light, plain background. The model restages what you give it, so a clean input protects your product through the process.
- Generate in small batches and cull hard. Keep the images where your product is unmistakably itself, discard the rest, and judge tools by what survives that cut.
- Describe one scene, clearly. Lighting, surface, mood. Long prompts cramming several ideas tend to muddy the result.
- Lock your winner before you scale. Once you know which model and scene preserve your product, reuse that recipe across the catalog for consistency.
- Keep a real shot of the true product on the listing too. AI scenes sell the vibe; one honest, accurate photo keeps trust.
The bottom line
There is no single best AI product photography tool, only the best one for the job in front of you. Reach for Photoroom when you need fast, clean catalog images and great background removal. Pebblely when you want simple themed shots without fuss. Claid when you are automating a large catalog. Flair when you want to art-direct the scene yourself. And Masonry when you want to compare the top models on your actual product and keep the best result instead of locking into one look.
Whatever you pick, test it on your hardest product first, the transparent one, the one with the tiny label, and judge on fidelity before you judge on beauty. The tool that keeps your product looking like your product is the one worth paying for.
If your shortlist is already narrow, use the current workflow comparisons for Photoroom vs Masonry, Pebblely vs Masonry, or Getimg.ai vs Masonry before running the same-SKU acceptance test. Before scaling a chosen recipe, run the three-SKU bulk product-photography pilot and require both product-truth and set-consistency acceptance.
Before choosing from headline plan prices, use the AI product-photography cost calculator to add source preparation, rejected attempts, review, correction, publishing, and external spend, then compare routes by cost per accepted asset.
For a fixed gift set or multiproduct listing, use the three-reference product-bundle image workflow to keep component counts and real packaging separate from an attractive generated concept.