The way clothing sells online changed. Shoppers now expect to see a garment on a real, varied model rather than a flat-lay or a ghost mannequin, and they largely do not care whether that model was photographed in a studio or generated by an algorithm, as long as the garment looks like the garment. That shift created a whole category of tools that promise the same trick: upload your flat-lay, get back an on-model shot, and they all lead with some version of "flawless fabric preservation."
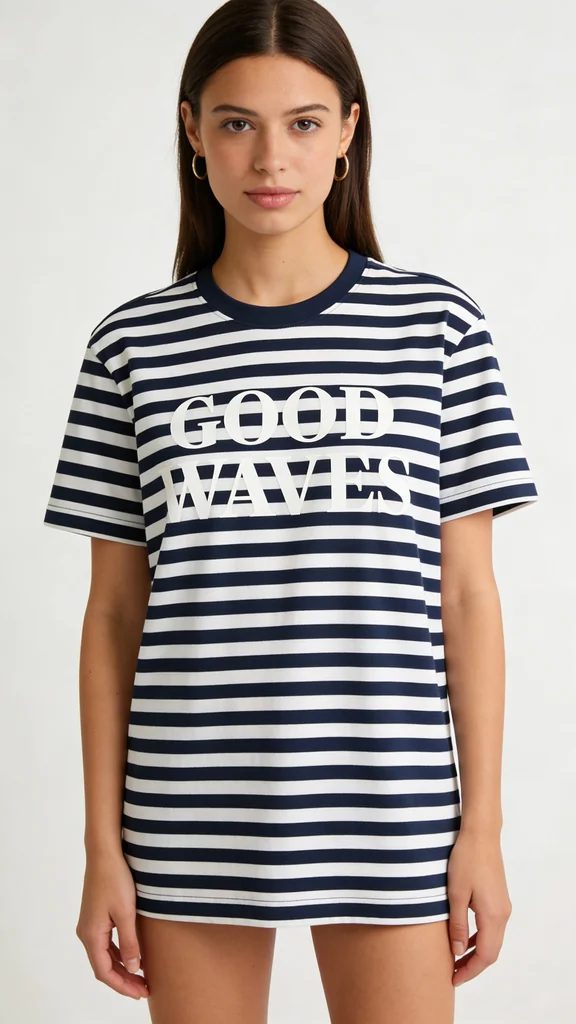
That phrase is the whole game, so I tested it directly. I made one controlled flat-lay, a navy-and-white striped tee with "GOOD WAVES" printed across the chest, and asked four of the strongest image models to put that exact shirt on a model, with the same prompt and the same source image. This is the first image-to-image test in our product-photography series, and it is a different question from the others: not "can the model draw a nice shirt" but "is it the same shirt." This is the clothing entry alongside the skincare, jewelry, supplements, makeup, food and beverage, footwear, candles, furniture, electronics, handbags, sunglasses, glassware, flowers, watches, perfume, packaging, pet products, toys, textiles, cookware, stationery, drinkware, soap, ceramics, art prints, earbuds, houseplants, knives, and automotive wheels tests and the broader best AI image model for product photography roundup.
Quick answer
- Best overall, and cheapest of the photoreal picks: Seedream 4.5. It put the tee on a realistic model and kept the chest print crisp and correctly laid out. The only model that preserved the garment's identity.
- The on-model photo is solved: all four produced a believable model wearing the striped tee, with the stripe pattern intact. Realism was not the separator.
- The print is where identity breaks: GPT Image 2 kept the text legible but restyled it, FLUX.2 Pro re-laid it to a single thin line, and Nano Banana 2 garbled it into the stripes.
If you only remember one thing: the model shot will look great no matter which model you use. Whether it is still your garment depends entirely on the model you pick, so judge the print, not the pose.
The test: one flat-lay, four on-model shots
I started from a single controlled source image so every model got the identical garment to preserve.
Then I passed that flat-lay as a reference to each model and asked for an on-model catalog shot, preserving the stripes and the chest print. Here is what came back.
Seedream 4.5 was the surprise. It is the model that made the best hero in the skincare, jewelry, and supplements tests, and here it did something the virtual-try-on literature says is the hard part: it kept the printed text faithful. The two-line "GOOD WAVES" came through crisp and correctly placed, the stripes held, and the model, drape, and lighting read as a real catalog shot. Best result, lowest cost of the photoreal models. If your garment carries a print, this is where I would start.
GPT Image 2 is usually the strongest text model, and it kept "GOOD WAVES" readable, which most try-on pipelines cannot do. But readable is not the same as faithful: it restyled the print into a distressed, vintage-looking treatment that blends into the stripes, rather than the clean serif of the source. For a brand whose graphic has to be exact, that is a drift, just a subtler one than a garble. It was also the priciest model in the test.
FLUX.2 Pro was the cheapest and, like elsewhere in this series, produced a clean main image. The stripes are good and the text is legible, but it re-laid the print: the two-line serif design became a single thin outlined line. The information survived, the design did not. This matches FLUX's pattern across the series, a strong overall image with the fine, exact details quietly altered.
Nano Banana 2 made a genuinely convincing on-model photo, the stripes, the fit, the pose all read right, which is exactly what makes its failure instructive. The chest print smeared into illegible shapes against the stripes. If you only looked at the thumbnail you would ship it, and you would be shipping a garment that no longer says what yours says. This is the headline risk of the whole category in one image.
The comparison
| Model | On-model realism | Stripe pattern | Chest print (the test) | Rough cost/image |
|---|---|---|---|---|
| Seedream 4.5 | Premium, hi-res | Preserved | Faithful, crisp, correct layout | ~4.8 credits |
| GPT Image 2 | Good | Preserved | Legible but restyled | ~20.4 credits |
| FLUX.2 Pro | Good | Preserved | Legible but re-laid (1 line) | ~3.6 credits |
| Nano Banana 2 | Good | Preserved | Garbled, illegible | ~9.3 credits |
Credit costs are first-hand from this test on Masonry; per-image rates move, so check current pricing before you budget.
Why the photo is easy and the print is hard
The split in this test is not random. It is exactly what the research on virtual try-on predicts, and understanding the why tells you what to watch for.
The photo and the garment are two different problems. Putting clothing on a believable model is about global structure, body, pose, drape, lighting, and modern image models are good at it. Preserving a printed graphic is about high-frequency detail, the precise edges of letters and logos. Diffusion models compress an image into a latent space to generate it, and that compression is documented to sacrifice exactly this high-frequency information first. The try-on literature is blunt about it: logos and printed text are often lost in the encoding, complex patterns can come back wavy, and embroidered logos can turn to blurs. So the default outcome is a great photo wrapped around a degraded graphic.
Which is why the model choice is the garment-fidelity decision. What this test shows is that the degradation is not uniform. The simple stripe pattern survived on all four models, because broad geometric patterns hold up better than fine type. But the printed text only stayed faithful on one model. The lesson is not "AI cannot preserve prints," it is "most models will not, and one will, so the model you choose is the decision that determines whether the garment in your catalog is actually yours."
The cheap-tool promise and the expensive-model assumption are both wrong. The specialized tools that promise "fabric preservation" are wrappers around these same models, so they inherit this exact behavior. And the most expensive model in the test was not the most faithful. The only way to know is to run your specific garment, with its specific print, and look.
How to shoot your clothing line without a model shoot
The workflow is the product photography roundup approach, applied to image-to-image. Start from a clean flat-lay of the real garment. Pass it as a reference and generate the on-model shot. Then judge the print first and the pose second, because the pose will almost always be fine and the print almost always is where the money is lost. Run two or three models, since the faithful one is not the obvious or the priciest one, and for an intricate logo or exact brand type, plan to overlay the real graphic rather than trusting any from-scratch render.
With the Masonry CLI you pass your flat-lay as a reference and fire the same prompt at every model from one command, which is exactly how the shots above were made:
masonry image "put this exact striped tee on a standing model, ecommerce on-model shot, preserve the print and pattern" --ref ./flat-lay.png --model seedream-4-5 masonry image "put this exact striped tee on a standing model, ecommerce on-model shot, preserve the print and pattern" --ref ./flat-lay.png --model gpt-image-2
The bottom line
On-model is the format clothing now sells in, and AI makes it cheap. But cheap and accurate are different: every model in this test produced a believable model in a striped tee, and only one kept the print on that tee faithful, Seedream 4.5, at the lowest cost of the photoreal options. The pattern survived everywhere, the print survived in one place. So the rule for clothing is simple: never judge the on-model render by how real the model looks, judge it by whether the garment is still yours. Run your own flat-lay across two models from one place with the Masonry CLI, or see how the same fidelity-first logic plays out across every product type in our best AI image model for product photography roundup.